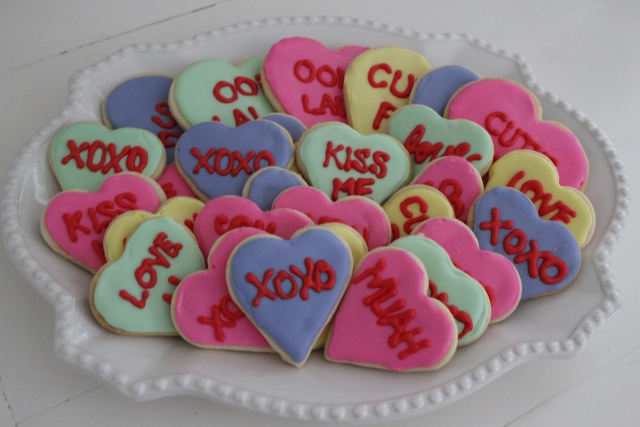
If you are in the baking mood and want to get in touch with your artistic side, these cookies are both fun and challenging to create. While the actual mixing and roll out portion is super easy, the decorating is more of a mindful practice. My cookies are in no way perfect, but I enjoy the process and love making them my own.

I know we all have a basic sugar cookie recipe, but this one is my favorite because of several reasons – it is super simple, you have baked cookies in no time at all, and they taste the best with the kind of soft texture I require of a sugar cookie. No crunchy cookies in my house.

I like to use a mix of almond and vanilla extract in the dough. I love the flavor of vanilla and can’t be without it in a sweet confection. I use almond because the icing has almond as well, and they compliment each other. If you like a certain flavor, by all means use it instead. These cookies can be your blank canvas to experiment on.


The best part of this dough is it does not have to chill. You can make and bake with no time in between – which is great for people such as myself who cannot wait to eat a cookie once they’ve started the process. I have a chocolate chip cookie recipe that requires DAYS between making and baking and its basically torture (if it weren’t for the cookie dough I sneak in the mean time).

So whether you want to eat a great sugar cookie, to test out your cookie icing skills, or need a gift for someone sweet, this cookie recipe is something fun to try.
Roll Out Sugar Cookies
Ingredients:
- 2 sticks unsalted butter
- 1 1/2 cups confectioners’ sugar
- 1 egg
- 1 teaspoon almond flavoring
- 1 1/2 teaspoons vanilla flavoring
- 2 1/2 + a little more all-purpose flour
- 2 teaspoons baking powder
- 1 teaspoon salt
Cream together butter and confectioners’ sugar in a large bowl. Add egg and flavorings, blending well. With a sifter on top of your large bowl, sift in flour, baking powder and salt, then mix until ingredients are just incorporated. You will know when the dough is ready by touching it – the dough shouldn’t really stick to your fingers. If dough is too sticky, add more flour. Let dough sit for 5 minutes.
Preheat oven to 400 degrees. On a lightly floured surface, roll out dough to about 1/4 inch thick and cut with heart shaped cutters (any size works – I used small and medium). Place on silpat lined cookie sheets and bake for 7-8 minutes, being careful not to let brown. I take them out when they look completely dry, but have no browning whatsoever.
Icing:
- one bag confectioners’ sugar (2 pounds)
- 5 tablespoons meringue powder (available at Michaels)
- 2 teaspoons almond extract
- 1/2 teaspoon vanilla extract
- 1/2 cup warm water (+ more if necessary)
Stir extracts into water. Using a whisk attachment on a stand mixer, slowly mix confectioners’s sugar and meringue powder. Add water and extracts slowly, with mixer on low. Once incorporated, whisk on medium-high for about 2-4 minutes, or until thick, fluffy and glossy. Icing should form a soft peak.
Separate icing evenly into four bowls (or into 5 if you want to do another color). Add pink food color to one, purple to another, green to another and yellow to the fourth. Since I used small amounts of frosting, only a little coloring was needed – so start with just a tiny bit, adding more until you get the color you want.
Here is an amazing trick for getting colors into piping bags. For each color icing, I place about 3 tablespoons into piping bag and pipe an outline around each cookie. Then you fill the outline with about 2 teaspoons matching icing and smooth to edge with an offset spatula. If your icing seems to thick, you can add a touch of water (works best with a spray bottle until you get proper flooding consistency). The flood icing stops at the outline, and dries smooth and flat. Place cookies by a fan to dry if you want them extra glossy. Let cookies dry for about 2 hours before piping any lettering.
To pipe lettering, dye leftover pink or leftover white frosting red. Use trick for piping bag above, and use #2 wilton tip to write phrases on cookies. Take your time and don’t get frustrated! It takes patience and practice. By the last cookie, I’m sure you will feel like a pro.
Depending on cookie cutter sizes used, this recipe makes about 2 to 2 1/2 dozen. Can be doubled.
food coloring // Wilton tips // icing bags // heart cookie cutters // Silpat // off-set spatula

